Showing posts with label MAC. Show all posts

Sunday, 15 April 2012

Depotting MAC Eyeshadows

As you may have seen in my second to last post I recently purchased one of the MAC 15 shadow palettes with the ambition of depotting my loose shadows into it when I could spare half an hour. I thought I'd document what I did (injury-free thank goodness) so you can have a go yourselves in your own time.

Here's what you'll need:
  • A towel or something similar to protect your work surface
  • A candle 
  • A sharp pointed knife
  • Tweezers
  • A MAC palette (obviously!)
  • Some adhesive magnets - I bought mine off eBay
  • Scissors in case you want to trim the labels 


So without further ado, let's get started!


1) Pop out the pan insert from the casing: Open the eyeshadow and VERY carefully wiggle the end of the knife into the groove where the pan insert meets the outer casing. Keep wiggling until the pan insert pops out. Make sure you don't press too hard and let the knife slip. Blood in your eyeshadows is not very becoming.


Once it has successfully popped out, you'll have something that looks a bit like this (note lack of blood):


Set the outer casing aside for now. You'll need it a bit later.


2. Removing the pan from the pan insert: Take your tweezers and hold the pan over the flame of the candle. Make sure you don't hold it IN the flame; you don't want to melt the plastic completely. Hold it there for around 30 seconds until you can see that it has softened.


Once you think this is the case, gently poke the bottom of the pan insert with the end of the knife to prise up the eyeshadow from the plastic.


If it doesn't want to come out, don't force it - the plastic just isn't soft enough. Hold it over the flame a bit longer and give it another go when you think it's ready. The plastic will be VERY hot when you do the poking so use the tweezers to hold it steady.

3. Stick on the magnet: Pretty self explanatory really. When the metal on the underside of the pan has cooled a bit and the glue on the bottom is still tacky, stick an adhesive magnet to the back (carefully so you don't damage the eyeshadow). Centre it by moving it on the tacky glue.


4. Removing the name label: This bit is optional, but I like to stick the label to the bottom of the shadow so I can keep track of the colours and finishes. As you can see this one is Modelette, a lovely matte brown.


The labels are usually very well stuck on so the best way of removing it without damaging it is to hold the casing over the candle at an angle to slightly melt the adhesive attaching it and a small area of plastic at the edge.


Make sure you don't hold it too close to the flame - burnt fingers/labels aren't amusing or attractive. As you can see in the clever split-picture below, once the plastic has softened you can take your knife and gently press down at the edge of the label to indent the casing. You should now be able to lift off the label causing little to no damage at all.


 The adhesive will still be sticky when you do this, so you will be able to place it straight over the magnet that you've just attached to the shadow. Feel free to trim it to neaten it up a bit.


5. Admire your handiwork!


It looks a little complicated at the outset, but the more you do it the more you'll get used to it. You'll be a pro in no time!

I suppose this means I now have to go and spend more money on seven more shadows to fill my palette. Any recommendations?

I hope you found this guide helpful - let me know if you have any questions :)

Sunday, 1 April 2012

Haul: MAC Tour de Fabulous (and a little extra)

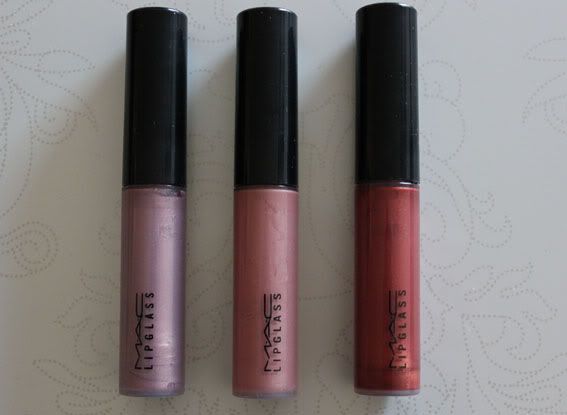
I've had my eye on this little array of lip products ever since it came out in the US (it feels like a year ago) and was surfing the MAC website randomly and noticed that the Tour de Fabulous collection had finally arrived on the UK site. This collection consists of limited edition lipglasses and lip pencils and in my opinion is definitely worth a look.

I picked up three of the lipglasses that really stood out to me:

Comfort & Joy, Rich & Witty, Rich Bounty


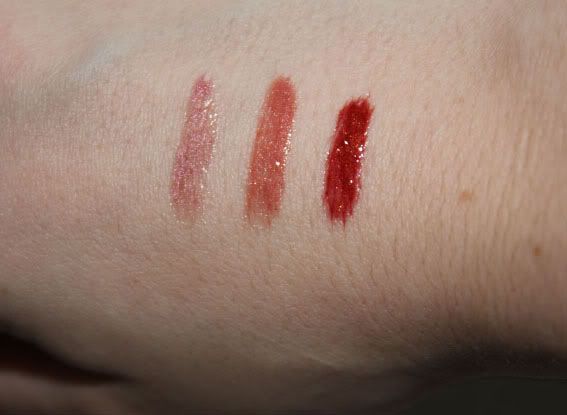
Comfort & Joy is a cool-toned pale mauve with moderate shimmer - very pretty! Rich & Witty is surprisingly opaque; it's a medium rose-pink with some subtle shimmer. It strikes me as a colour that'd look lovely on the beach! Finally I picked up Rich Bounty. I'm not usually so adventurous when it comes to dark lip colours as I'm fairly pale, but the shade was just so gorgeous I just couldn't resist. It is a coppery red again with some subtle shimmer. I think this would be paired best with a lipstick underneath to prevent any unevenness showing (a slight drawback!)
Onto some swatches!

Comfort & Joy, Rich & Witty, Rich Bounty - same order as above, clever hey?


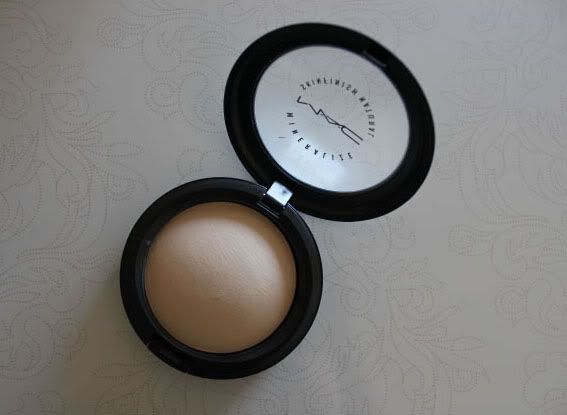
While I was online I used the free shipping incentive to pick up a couple of other bits. I'd run out of the wonderful Mineralise Skinfinish Natural (Light) and was slightly fed up of shining like a beacon so it was an obvious choice...

MAC Mineralise Skinfinish Natural - Light


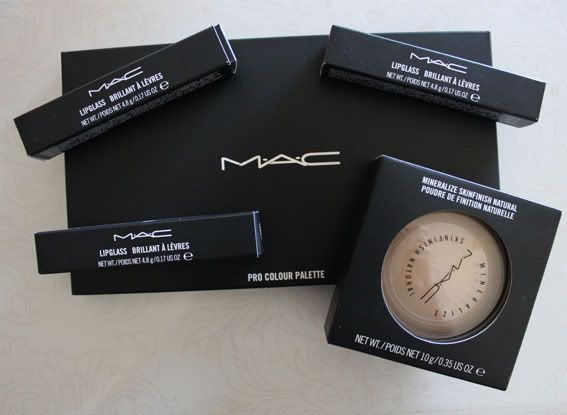
I also picked up one of the MAC Pro palettes to house my MAC eyeshadows. I'm really looking forward to depotting them/burning my fingers once my magnets arrive. Here's a picture of my haul in it's entirety so you can see the chic black loveliness of the packaging:


All products mentioned are available at www.maccosmetics.co.uk (Tour de Fabulous for a limited time only). That's all for now, thanks for reading!


Tuesday, 6 July 2010

June Favourites

Well hello there. Today I thought I'd reiterate and go into a little more detail on what I said about the products mentioned in my June Favourites video. I've included pictures and little labels where needed using a pretty little font that I got excited about and downloaded :)

1. Simple Kind to Skin Facial Cleansing Wipes - Pretty much what they say on the packaging! Simple, kind to skin and well...cleansing. I got these on offer and I think they worked out at about £2.99 for a pack of 25 which really isn't bad for what they are. They're unscented, unabrasive and completely safe for taking of even stubborn waterproof mascara; no sting or other unpleasantness when used around the eye area. Definitely worth every penny and very easily overlooked with so many competing products on the market!


2. Maybelline Dream Matte Mousse Concealer (£4.99) - If you've seen the video you'll notice that I use this as part of my everyday foundation routine and there are plenty of reasons why! Well the main one is that it just works. It conceals even my silly dark circles that plague every morning of my existance with ease...and that makes me happy. You can see below that it is a really novel product, a mousse to powder formulation which is not cakey (providing you don't splat on too much or press too hard when getting it out of the pot) and really easy to apply. I'm not sure how long this will last - it doesn't look like there is that much in the pot and you have to consider there is a certain amount of air in the product itself, but either way I can definitely see myself purchasing this again.

3. Maybelline Dream Matte Mousse Blush in Peach Satin (£4.99) - To keep it brief, it has exactly the same consistency and application as the concealer mentioned above. Peach Satin is a lovely colour and will match most skin tones. I've been loving this so much because it gives a hint of a rosy glow on my pale English skin :) A word of warning though if you don't like shimmery blushes, this is a little so I'd recommend checking it out in person to make sure it is your cup of tea.


4. John Frieda Frizz Ease Straight Ahead Style Activating Daily Conditioner (£5.99) - Ahh the source of my wonderful video blooper. You may notice that I don't have a picture up for this. I threw the bottle away in rage after I'd wrapped up the filming and washed my legs :) Despite that, I really love this conditioner. To me it has the effect of a deep conditioning treatment, but every time you wash your hair and use it (as it is designed to be used daily). It's pretty good value for money too as you get a lot in a bottle and it lasts a suprisingly long time (obviously this depends on how long your hair is). No frizz has been experienced in humid, windy or rainy conditions leading me to think that this really is another hidden gem on those drugstore shelves :)

5. MAC Easy Lounger Lipglass (£12.00) - Well it would have been rude to let the 'To The Beach' collection leave my MAC counter without me getting at least one item with a beachy graphic on it wouldn't it? Nothing else really caught my eye and I bought this on a whim because I thought it was pretty. And it is :) Not one for people who like matte or sheer lip finishes as this is VERY glittery. However it's very glittery in a very nice way. I wouldn't usually pick up something this bedazzled but the colour just drew me in and now I'm hooked. I'll mostly be wearing this to the beach where the sun can make me sparkle!

6. MAC Pretty Plush Plushglass (£14.50) - I originally picked this up because I wondered what there could possibly be in this to warrant the extra £2.50 on the cost of a basic lipglass. I am still wondering this a little, but this colour just goes so perfectly over a number of lipsticks and does give a slight plumping effect. This is a favourite mainly because of the colour and versatility and I've just found myself reaching for it a lot lately. It's shimmery but not disco ball-esque and gives a nice polished finish to your look :)


Now for the nail polishes...


7. Essie Van D'Go (£9.50) - Yes yes I know I could have picked this up much more cheaply than I did, but I was wandering in Liberty and couldn't resist. Bad me. Despite the widely known consistency problems this polish has, I have been completely sucked in to the colour. I'm finding it a more toesy shade and it really sets off a tan if you're lucky and happen to have one. My feet seem to be browner than the rest of me at the moment, so this is perfect for making them seem even darker.

8. Essie Lilacism (£9.50) - The second part of my Essie splurge, and oh what a worthwhile splurge. I adore this colour. I've usually been wary of purples because for some reason they seem to clash strangely with...me in general. This is just the right pastely shade for toes, fingers and anything else you fancy licalising. Unlike Van D'Go the application of this polish is a breeze :)

9. OPI Bubble Bath (£10.00) - Oops, a Selfridges splurge. People should really keep me away from London. I've been wanting to get this for a while and three weeks into owning it I have found myself reaching for it so much. It's the ideal baby pink colour and can easily be worn both casually and formally, matching nearly everything you could dream of wearing with it. A new firm favourite. (You should have seen my Mum's face when I got home brandishing a *pink* nail polish. I'm a notorious tomboy...I think she had an epiphany. That or a 'funny turn.'


That wraps up my June lovelies! Thanks for reading if you've lasted this long :) Hopefully I've made a promising start to this blog, I'll try to keep it up!